Step 6
Creating the “drive Forward” function structure
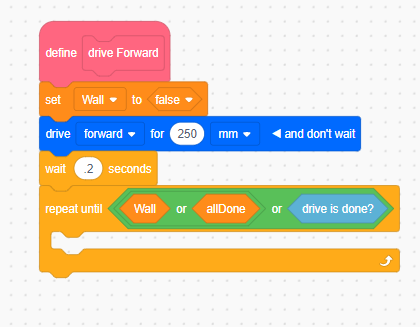
Now let’s begin defining our “drive Forward” custom block/function.
Add the code to the “drive Forward” definition as shown. We start off by setting the “Wall” variable to false so we can change it if we find a wall while we drive forward.
We then tell our robot to begin driving forward. An important thing to note is the “and don’t wait”. This means that the code will continue on without waiting for the robot to finish driving forward.
We then add a very small pause of .2 seconds before beginning a new loop. This new loop will repeat until one of three things happens, either the robot detects a wall, detects it is at the end, or has finished driving 250mm (the size of one “grid” square). Once the loop is done, the function will complete and return control to the code that called it.
All we need to do now is write the code to help check these three conditions. Luckily, the robot can automatically tell us if it has finished driving forward, so we only need to code the wall detection and the maze completion detection. We’ll go over this on the next page.