Step 3
Coding Loops in Minecraft
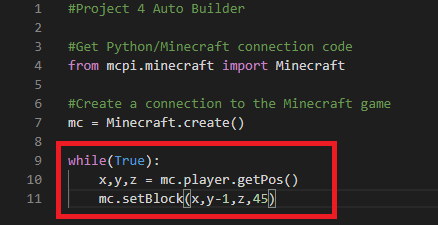
Now that we have a bit of an understanding of how loops work, add the code shown here into your project.
In this loop, we have two lines of code that repeat. The first contains the getPos() function which means every time this loop is repeated, the x,y and z variables get updated to be where the player is. Because of loops these variables will constantly tell us where the player is, even as they move around.
The second line contains the setBlock() function. Combined with the previous line, we will set a always set a block relative to the player’s position! Here we say y-1, which means one block under the player.
Once you have this code completed, run your code and test it out inside Minecraft. You should have blocks appear under you whererver you go! To stop the program, go to the Terminal and press Ctrl+C.
Now that this is working, think of some other ways you can use this new knowledge of loops. Try combining this with other projects we’ve done before to see what happens! Think of some other ways you can improve or add onto this code.


