Step 1
Opening/running the project
Before we start, let’s review how to open and run the project. For a more detailed walkthrough, see Project 0. If you still need to download/setup IntelliJ or the projects folder for this class, see Project 0.
In the top left corner, click “File”->”Open Project” to open up “Project 1.” Then open up the “Main” file within its folders.
Once you have the “Main” file open, go to the top and click “Run”->”Run” and follow along as shown. If you see the code run on the bottom you’re good to go! If not, you may need to do some of the setup such as installing the JDK, see Project 0 for more info on this.
After this intial run, any other time you’d like to run the code you can do so by pressing the green play button in the top right of the screen.
Analyzing the code
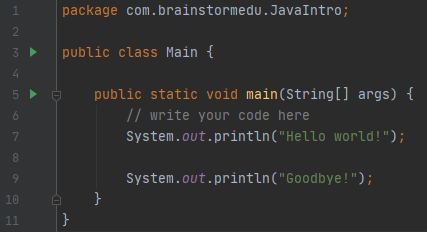
Now that we have our code working, let’s take a look at what’s going on before we move on. The numbers to the very left of the code are the line numbers of our code. When describing code, the line numbers help signify which code we are talking about. When you are coding, it is best to try and keep your line numbers the same as shown; however, this is optional. As long as the code and order of the code is the same, the line numbers don’t affect how the code runs.
On line 1, we have the package name. This is how our code knows what program/package it belongs too. All packages start with “com.” then it is the name of the company, and then the name of the project. “com.CompanyName.ProjectName”
On line 3, we have a class declaration. We’ll go over what “public” means later, but here we are making a public class called “Main”. A class is a group of related code kept together because of the fact that it’s related. For example, in school, classes all have students in them with some similarities. For example, a 6th grade class will all be around the same age, and more or less the same level of schooling. They may even live near each other if it is a public school!
Notice the “{” curly braces. There is an opening “{” and a closing one “}”. All the code in between the curly braces is inside the class. Curly braces are what Java uses to know what code is grouped together, these are very easy to mess up so be careful!
On line 5, we create a function called main. We’ll go over functions a bit more later since they are a little advanced.
On line 6 we have something called a comment. Comments always start with a “//”, this is text that is completely ignored by Java when the program runs. So why is this important? Programmers use comments as notes to themselves and other programmers to help understand what is going on in their code. They are very useful when going back to old code or when looking at somebody else’s code!
On lines 7 and 9 we see something called a print. These lines of code output the text inside the “()” to our program, which is why we can see these messages when we run our program. The “.” usually means go into the data on the left side to use something on the right side. For example, here we go into “System” to get access to “out” and then get access to “println” from “out”. It’s a bit complicated right now, but don’t worry it should make more sense later.
Also, notice how the text inside the prints is in quotes ‘””‘, when you see a word in quotes, it is telling Java that that word is “text” or a string. This is important because if you removed the quotes Java actually wouldn’t be able to understand this code at all, try deleting the quotes to see what happens.